Shedding Some Light On LEDs
Light Emitting Diodes (LEDs) have many advantages over normal incandescent filament bulbs when it comes to adding them to models. They require much less current (which means longer battery life), they are much more reliable (they should never burn out or need replacing), they do not generate any heat, and they are available in a variety of colours, shapes and sizes. Probably the only disadvantage is they are slightly more complicated to wire up (but that shouldn't be a problem once the basic rules are understood).
The Basics
LEDs are semiconductor devices and are polarised - that is they have to be connected the correct way round to work. You also can't just connect them directly across a battery because too much current would flow through the device and damage it. For a particular type of LED you need to know two things - it's forward current and forward voltage.
The forward current (referred to as If) is the amount of current the device needs to operate correctly. This is usually quoted as an average and a maximum - for long life, you should stick to using the average value. Typically this is in the region of 20mA (by contrast an incandescent bulb may require 200-300mA).
The forward voltage (Vf) is the voltage the device needs across it at the specified forward current. This is typically 2.0 - 3.0V for a forward current of 20mA. Both these specifications should be quoted for the LED's when you buy them, either in a catalogue (if they are sold loose) or on the packaging.

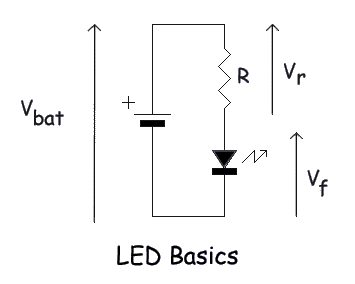
The way to control the voltage and current the LED receives is with a resistor connected in series as in this diagram. For a given battery voltage of Vbat and LED forward voltage of Vf, we need to drop Vbat-Vf volts across the resistor (Vr). We also need 20mA (0.02A) to flow through the resistor (and through the LED since they are in series).
Now for some maths (bear with me, it's not exactly rocket science...)
Ohms Law states that:
Voltage = Current * Resistance (or V = I * R).
By rearranging this we get R = V / I which in our case expands to (Vbat - Vf) / 0.02 = R.
Thus for a 3V battery and a Vf of 2V, R = 1/0.02 or 50 Ohms. For a 9V battery you would need 7/0.02 or 350 Ohms.
When you go to buy your resistors, you may not be able to find the exact value you calculated. Resistors come in a range of what are called preferred values. In this sort of application it's fine just to pick one with the nearest value to that you require. Resistors also come in different power ratings (or wattage) - 1/4W or less is fine here - higher rated devices will be physically larger.
If you want to add more LEDs to the circuit, you can connect them in either series or parallel. In series you only need one resistor because the same current will flow through each LED, however, the battery voltage must be greater than the sum of the forward voltages of all the LEDs. Also if one device should fail, then the circuit will be broken and all will go out. In parallel, each device has it's own resistor, and will work independently of the state of the others. A parallel configuration should be used if the LEDs have different characteristics, e.g. they require different forward currents for a given voltage.
Polarity Identification

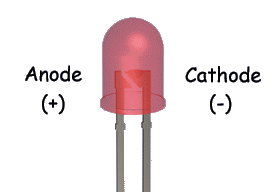
As mentioned above, an LED must be connected the right way round, or it just won't work! There are several methods for identifying which lead is which, including one lead being longer, or a small chamfer on one side of the body, but they often seem to vary, so I prefer the following method (which only fails if you can't actually see inside the body).
Look inside the LED from the side, at the top of the 2 leads. Regardless of the actual shape of the LED, the insides should look similar to the picture. One lead ends in a much larger shape than the other. This larger blob is always the cathode which should be connected to the negative (-) side of the battery or circuit. The other lead is the anode and is connected to the positive (+) side of the circuit.
Types of LED
When someone says LED, most people think of the round 5mm red ones - but this is just the tip of the iceberg. LEDs come in all colours, brightnesses, shapes, sizes, and functions, so it pays to shop around to see if there's something that best suits your application directly.
Colours
These days LEDs are available in a range of colours - red, green, orange, yellow, blue and even white. There are even more exotic colours such as turquoise, violet and ultra-violet but they are considerably more expensive than common reds & greens.
The housing of the LED is made from an epoxy resin. Whilst it has to be translucent to allow the light out, there are different types of translucency available. The most common is "diffuse" - this is the same colour as the device and looks cloudy, to help diffuse the light evenly from the speck of semiconductor (which would only be about 1mm square) into the top portion of the housing (the bit you look at!). Next there are what are generally termed clear coloured (e.g. clear red). These have the colour but not the cloudiness of the diffuse types, and tend to be used for higher brightness devices. The tradeoff is they do not have such a wide viewing angle - if you're not looking almost head on, you'll not see much at all. Finally there are totally transparent ones known as "water clear". Again the viewing angle is narrow, but these offer the greatest contrast between 'on' and 'off' especially in bright conditions.
Multicolour LEDs are produced by putting several different devices onto the same piece of semiconductor. The connections to each are brought out through more than the usual 2 legs. By varying the current through each device independently, any colour of the spectrum can be produced.
Brightness
LED brightness is usually quoted in Candelas or fractions thereof. 1 Candela = the brightness of a standard candle ( although quite what a that is I'm not sure!). Brightness has increased dramatically over the last few years and it is now possible to get devices that can be measured by whole Candelas. However a typical diffuse LED would be in the order of 10s of milliCandelas (mCd) or even less than 10 mCd. If you find particularly cheap LEDs, they are likely to fall into this category. High brightness types usually have exciting names like Super, Hyper or UltraBright, but you will have to pay more for these so make sure you select what is appropriate for the application.
Shapes and Sizes
The most common shape of LED is a round cylinder with a hemispherical end (where the light is emitted), and in sizes of 5mm or 3mm in diameter. It is also possible to buy this shape in diameters of 8mm and 10mm but they are a little harder to come by. A 10mm water clear red makes an excellent pupil for a life- sized T2 Endo skull!
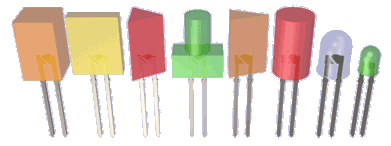
As well as these standard shapes, there are a variety of more exotic ones, illustrated here.
